


Ghostreader Prompt Customization
You can enrich your reading experience with Ghostreader's built-in prompts written by the Readwise team, but you're not restricted to only those use-cases. The option to fully customize those prompts or even write your own is arguably Ghostreader's coolest feature.
This page will guide you through the basics of crafting a Ghostreader prompt, using the default summarization prompt as an example. Or, for an even quicker start, you can jump over to the prompt library to copy/paste some prompts created and shared by others.
Scopes
One of the first things to understand about creating prompts for Ghostreader is the concept of a prompt's scope. Scope here refers to (a) how much of the original document content is selected/highlighted and (b) where the Ghostreader response is outputted.
- Document prompts, such as summarizing the document or extracting takeaways, operate at the whole document level. On mobile, the response is outputted to the document note field.
- Paragraph prompts, such as simplifying text or expanding a concept, operate on the individual highlight level (when the highlight is longer than 3 words). On mobile, the response is outputted to the highlight note.
- Word or phrase prompts, such as define or encyclopedia lookup, operate on the individual highlight level (when the highlight is 3 words or fewer). On mobile, if Quick Lookup is turned off, the response is outputted to the highlight note.
- Automatic prompts operate at the whole document level and acan be run automatically when a document is added to your Library. Currently, Ghostreader only has two automatic prompts: auto-summarizing and auto-tagging.
Customizing Prompts
You can customize any prompt from the Ghostreader section of the Preferences menu in the web and desktop apps.
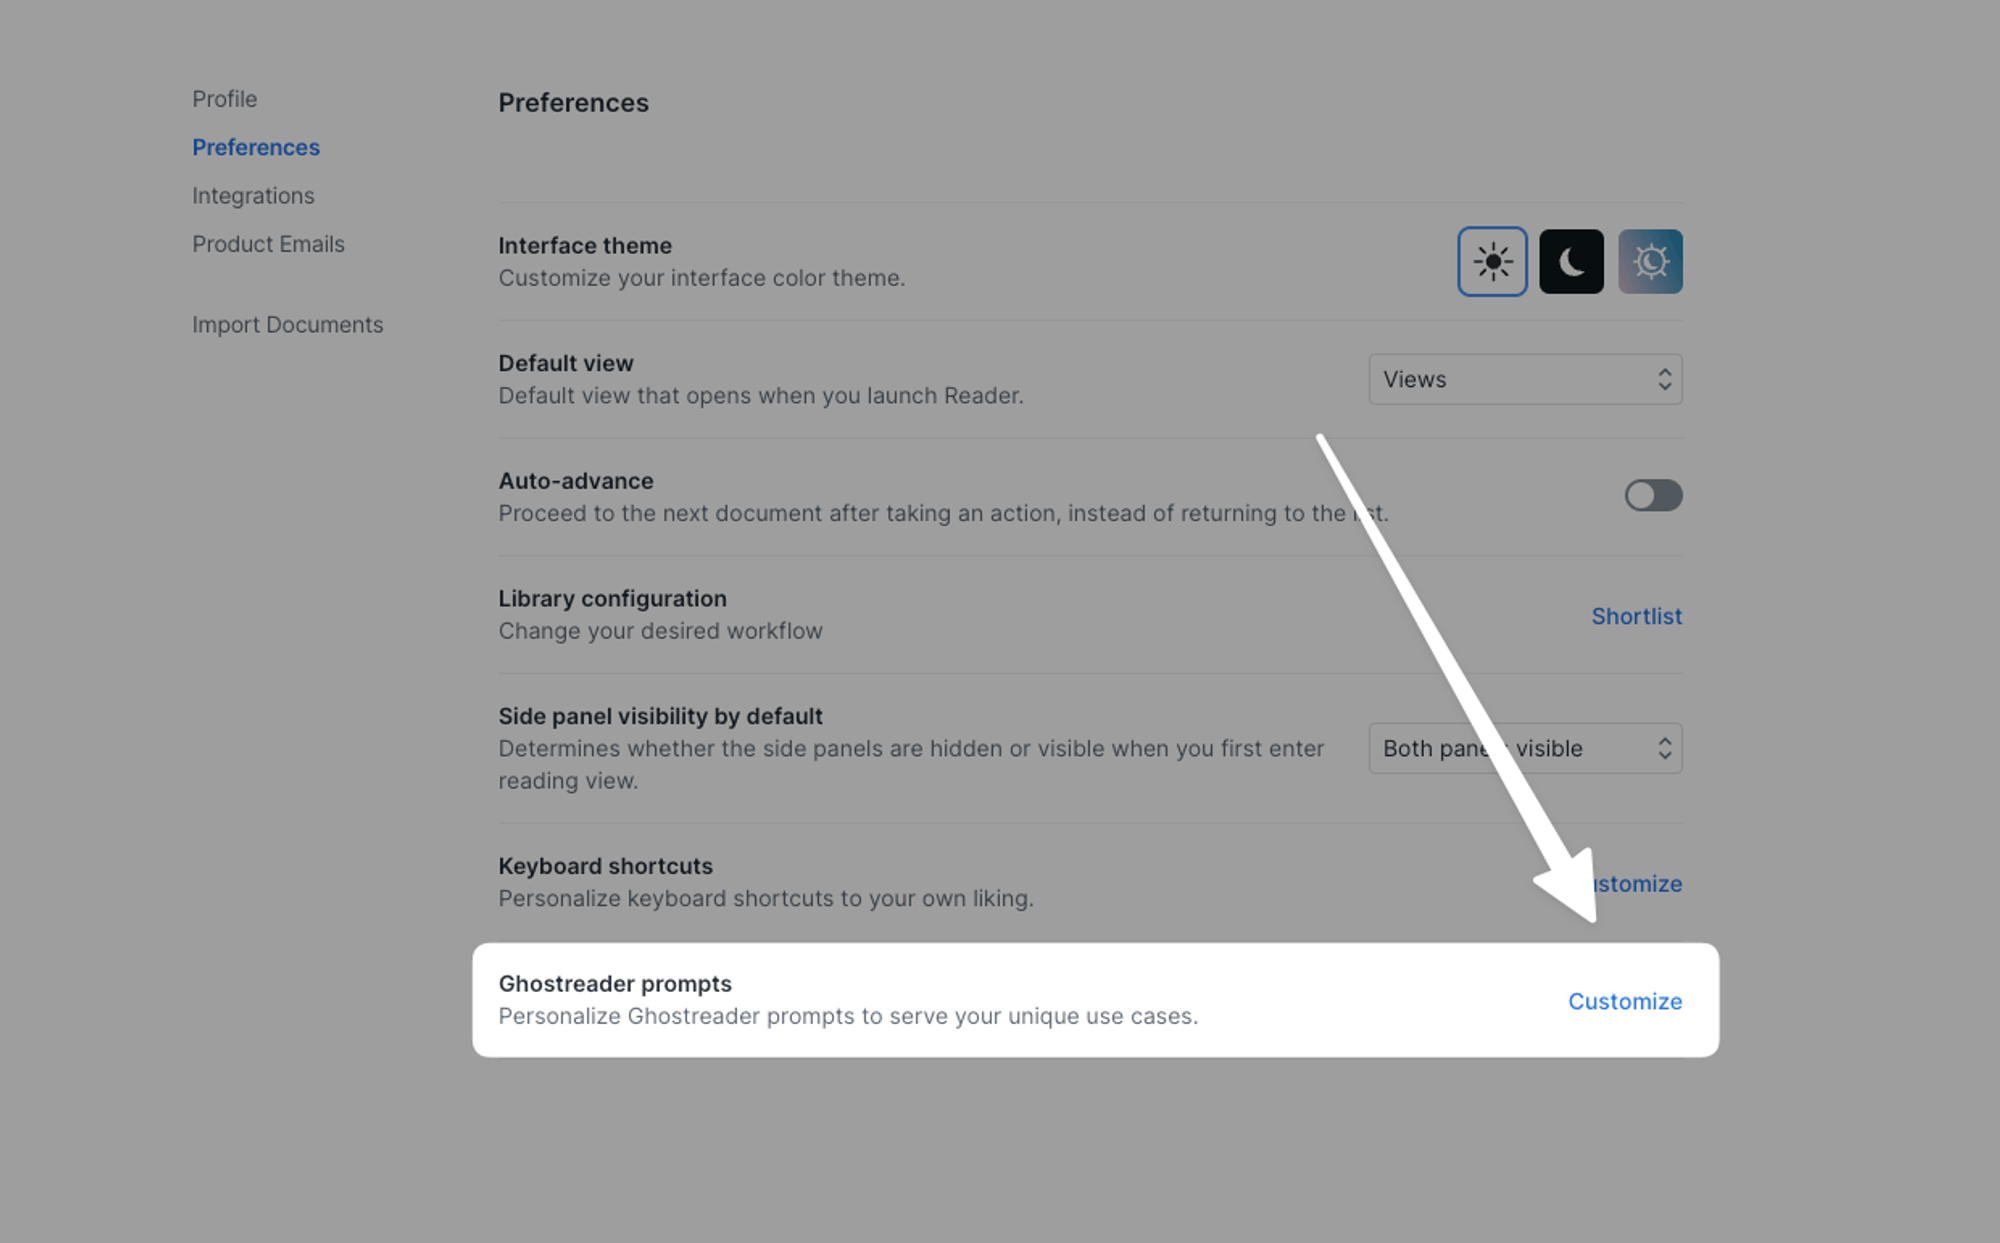
Here you’ll find all the prompts that can be customized, organized into sections based on scope.
Anatomy of a Prompt: Summarize the document
To explain how a prompt is created, let's take a look at the default summarization prompt. To get started, click Edit prompt next to Summarize the document.

If it’s your first time editing it, you'll see the default prompt that’s currently being applied to your documents:
{#- BACKGROUND: This prompt instructs ChatGPT to summarize the document into three information-dense sentences. It's intended to be used after you're done reading. If you want your summaries in a language other than English, we recommend rewriting the entire prompt in the target language. You can get quite creative using combinations of logic and variables to enable all kinds of creative use cases. See the documentation for details and examples. -#}
Write three easy-to-read sentences summarizing the following text:

===
Title: {{ document.title }}
Author: {{ document.author }}
Domain: {{ document.domain}}
{#- The if-else logic below checks if the document is very long, long, or short in order to not exceed the GPT "prompt window". We highly recommend not changing this unless you know what you're doing. -#}
{% if (document.content | num_tokens) > 25000 %}
{{ document.html | central_paragraphs | join('\n\n') }}
{% elif (document.content | num_tokens) > 2500 %}
{{ document.content | central_sentences | join('\n\n') }}
{% else %}
{{ document.content }}
{% endif %}

IMPORTANT: Write no more than THREE sentences. Each sentence should be short and easy-to-read. Use words sparingly and please capture the big idea.
You’ll notice several uses of single or double curly brackets, sometimes with percentage symbols or hashes. This is the syntax of the templating language known as Jinja2. Even basic knowledge of Jinja can allow for lots of creative uses—including if statements and if-else statements—as well as inserting the custom variables we’ve created to render your prompt with the target document’s content and metadata.
Now, let’s break the default summary prompt into its parts.
Commenting
Template part: {#- BACKGROUND: This prompt instructs ChatGPT to... -#}
The {# notation is how you leave a comment in a Jinja2 template. We’ve written this template to help orient users who don’t read the manual. The - symbol ensures that no blank space is left behind when the prompt renders. (More on what rendering means below.)
Plain Language Instructions
Template part: Write three easy-to-read sentences summarizing the following text:
This is just a plain language instruction, like what you might write inside a ChatGPT chat.
Delimiters
Template part: ===
This is just a random delimiter to let GPT know that you’re separating the text you want summarized from the rest of your instructions. Three quotes was a common convention when GPT was first getting popular, but you could use anything (a few backticks, a few plus signs, etc.)—there's no syntax rule that requires it to be quotes.
Metadata Variables
Title
Template part: Title: {{ document.title }}
Now we’ve arrived at the first custom variable of this prompt. When Ghostreader renders this prompt, it replaces {{ document.title }} with the title of the document being summarized. So if you were summarizing an article entitled Hunter S. Thompson's Letter on Finding Your Purpose and Living a Meaningful Life, this line would render Title: Hunter S. Thompson's Letter on Finding Your Purpose and Living a Meaningful Life.
Author
Template part: Author: {{ document.author }}
This variable will be replaced with the name of the document author. So if you’re summarizing The Art of War, this would render as Author: Sun Tzu.
Domain
Template part: Domain: {{ document.domain}}
This variable will be replaced with the name of the domain that the document was saved from. So if you’re summarizing an article from the New York Times, this would render Domain: nytimes.com.
If Statements: Content Length
Opening if tag
Template part: {% if (document.content | num_tokens) > 25000 %}
This is an important if statement. LLMs have what’s known as a “context window” (discussed below). The pipe symbol | followed by the subroutine num_tokens after document.content checks how long the document is in tokens. If the document is longer than 25,000 tokens, the next line reduces the document to a manageable amount of text that doesn’t exceed the GPT context window.
What to do when if returns true
Template part: {{ document.html | central_paragraphs | join('\n\n') }}
If the document is too long to fit in the context window (or you don’t want to spend an excessive amount of money on API credits), this line runs a custom subroutine we’ve made called central_paragraphs which reduces the document to its most important paragraphs. This specific line is meant for very long documents, which often fail with the central_sentences subroutine (explained below).
The join('\n\n') filter ensures that the paragraphs are returned with two line breaks between each one to keep them separated.
elif tag
Template part: {% elif (document.content | num_tokens) > 2500 %}
The elif tag functions essentially the same as the if tag, but it will only run when the original if statement assesses to false. In this case, it will run on any documents that are shorter than 25,000 tokens, and it will assess to true if the document is still longer than 2,500 tokens.
What to do when elif returns true
Template part: {{ document.content | central_sentences | join('\n\n') }}
Like the answer for the opening if above, this line runs a custom subroutine called central_sentences, which reduces the document to its most important sentences. This subroutine employs a popular LLM framework for embedding-based extractive summarization.
else tag
Template part: {% else %}
Following an if statement, this else statement indicates what should be done if the results of the if statement and the elif are both false—in this case, if the document is not longer than 2,500 tokens.
What to do when if returns false
Template part: {{ document.content }}
This variable renders the full content of the target document.
Closing if tag
Template part: {% endif %}
This delineates the end of the if-else statement.
A Note About Context Windows
An LLMs “context window” is the amount of information it can refer back to when generating a response. Essentially, it’s like the model’s short-term memory. Different models have differently sized context windows.
The if-else logic included in Reader’s default summarization prompt (explained above) checks to see if the document’s content will exceed a certain number of tokens. If the provided content exceeds the context window of the selected model, the Ghostreader prompt will fail, so this logic helps avoid that.
Final Instructions
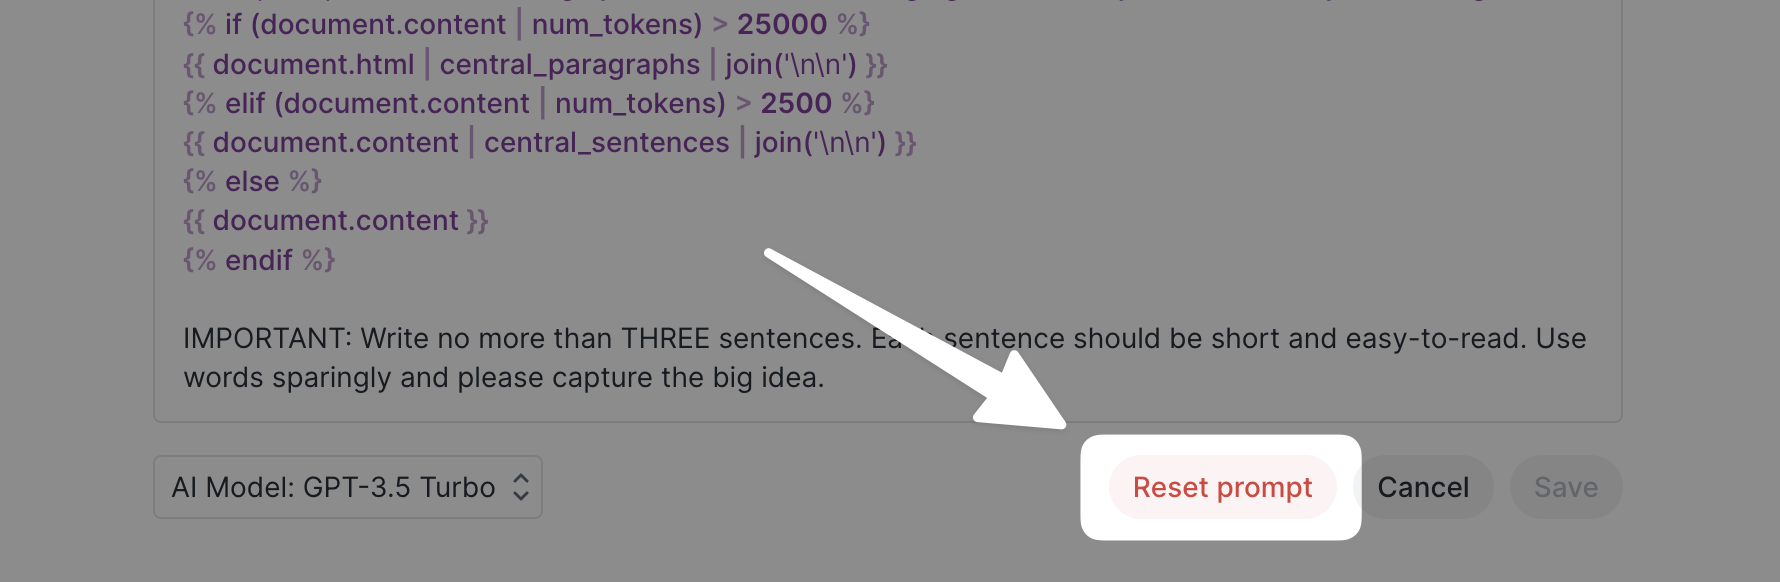
Template part: IMPORTANT: Write no more than THREE sentences. Each sentence should be short and easy-to-read. Use words sparingly and please capture the big idea.
This is another plain language instruction, this time emphasizing the crucial points of the prompt. LLMs get off track fairly easily and thus benefit from the repetition of rules, so it doesn’t hurt to re-state important concepts that were already included at the beginning of the prompt.
Reset to Default
If you've made some edits to a default prompt but decide you preferred the original or want to start fresh, you can use the Reset prompt button to return the prompt to its default value.
Non-English Summarization
One of the most straightforward use cases of customizing your summary prompt is to get Ghostreader to write summaries in a language other than English. Large language models are trained on all the publicly available text on the internet, which is largely written in English, so they have a strong bias to respond in English even if you give them instructions to, say, “Write this summary in German.” To overcome this bias, it’s extremely effective to rewrite the entire prompt in German itself.
Verfassen Sie umgehend drei knappe, leicht erfassbare Sätze zur Zusammenfassung des nachfolgenden Textes:

...

ACHTUNG WICHTIG: Begrenzen Sie sich strikt auf drei Sätze – jedwede Ausschweifung ist inakzeptabel. Jeder Satz muss präzise, unmissverständlich formuliert, sowie grammatikalisch und orthografisch korrekt sein. Fassen Sie die zentrale Aussage knapp und ohne Umschweife zusammen.

Schreiben Sie eine Zusammenfassung auf Deutsch:
We’re using German here as an example, but obviously you should translate our English prompt to your desired language.
Jinja Basics
As mentioned above, Ghostreader uses a templating language called Jinja2 for its prompt templates. To help you navigate these areas of your prompts, here are some of the basic Jinja functions that are most useful for crafting Ghostreader prompts.
ChatGPT is surprisingly good at writing and error-checking Jinja. Try asking it for help if you get stuck!
Commenting
As mentioned in the prompt breakdown above, comments use the syntax {#- COMMENT TEXT HERE -#}. Anything included between the two - symbols won’t be used in the prompt, so this is a great place to make notes to yourself (and others, if you share your prompt) or explain the logic behind a certain piece of the template.
If-else statements
If you’re familiar with any programming languages (JavaScript, Python, etc.), the concept of an if-else statement is probably old hat. If not, here’s a brief explanation, as stated in the Jinja documentation.
In the simplest form, you can use it to test if a variable is defined, not empty and not false
For example, you could use it to check if a document has a note:
{% if document.note %}
Document Note: {{ document.note }}
{% endif %}
If the document does have any text in the document note field, the if statement will return true and the note will be included. If it doesn’t, the statement will return false and won’t output anything.
You can get even more creative with the use of elif and else. This lets you branch your if-else statement into various outcomes—whichever if evaluates as true first will be the section that gets run on the input.
{% if "?" in document.title %}
...
{% elif "Twitter List" in document.title %}
...
{% else %}
...
{% endif %}
With the above template, a document called “Is this a Twitter List?” would use the first section of the prompt, a document called “Just another Twitter List” would use the second, and a document called “I’m a listicle” would use the third.
Try nesting if-else statements!
You can put if-else statements inside of each other to achieve more complex logic. For example, a prompt might first run an if statement to check if the document is a Twitter List, and if that returns false, then it would run the usual summarization prompt and its if statement to check the document length.
You can nest as many if-else statements as you’d like, but be warned that it’s easy to lose track and write a failing prompt. If you had no trouble following the plot of Inception, you’ll probably be okay. If not, well… if-else at your own risk!
Using the length filter for highlights
You can use the Jinja filter length to check how many highlights a document has and use it to set an if statement, like so:
{% if document.highlights | length > 2 %}
...
{% endif %}
This would only render the results of the enclosed section if the target document has 3 or more highlights.
Setting custom variables
You can set your own custom variables in a prompt by using the {% set %} command, like so:
{% set highlight_number = (document.highlights | length) %}
This will allow you to use the highlight_number variable to insert the number of highlights on the document. For example:
End the summary with a new line, followed by the sentence "This document has {{ highlight_number }} highlights."
Model Selection
GPT-5 Mini is included with your subscription. You can use a more advanced model if you'd like, but it requires using your own OpenAI token. That said, we caution you to be careful not to use o3 and try to summarize an entire book’s content—you might be a bit shocked by your next OpenAI bill.
If you've added your own API key, you can change the model of any prompt by selecting your desired model from the dropdown menu in the lower left corner of the prompt editing screen. Don't forget to click the Save button or the new model won't be applied.
Automatic Prompts
Ghostreader has two automatic prompts that work slightly differently than the rest of the prompts: auto-summarization and auto-tagging. These two prompts are listed in their own section of the Ghostreader customization page, and they can't be deleted or moved to another section.
The auto-summarization prompt (the default of which was discussed above) outputs its response into the summary field in the document's metadata. It can be set to run automatically on any document that gets added to your Library, and it can also run automatically on any new document in your Feed if you've added your own API key.
The auto-tagging prompt outputs its response as document tags. With how subjective most people's tagging systems are, this prompt is a bit trickier to use effectively. We'll discuss why, and our best recommendations for how to try, in the following sections.
Ghostreader Tagging (tag at your own risk)
Before we get started with this section, we'd like to highly recommend you don't turn on the auto-tagging feature until you've taken some time to customize and test your auto-tagging prompt. Doing so is likely to flood your account with new tags that you may or may not want, and deleting the extraneous ones can be quite tedious.
With that out of the way, let's discuss Ghostreader's tagging functionality!
Using an LLM to “tag” a document is an extremely cutting edge approach. Historically, this problem has been approached through a technique called topic modeling, which takes a huge set of text documents, converts each document to a numerical representation, and then clusters those documents based on how mathematically “close” they are to one another. Then the text in those clusters are analyzed for unusually frequent words in the related documents.
That’s kind of a black box. This is much more fun.
In order to get this to work, you need to write a prompt that gets GPT to respond with a set of 1 to 6 comma-separated tags.
If the output is not formatted as a comma-separated list, the prompt will fail. For example, if GPT responds with a bunch of explanatory verbiage, it’s going to fail.
Taxonomy Prompt
The most effective technique for getting GPT to tag your documents, by far, is what we’re calling a taxonomy prompt. This is where you explicitly describe all the tags used in your system and a short description of how they’re used. While effective, it’s also the most laborious to craft.
Here’s an example taxonomy prompt that might work for a news/magazine reader:
Your job is to categorize various types of documents including web articles, ebooks, PDFs, Twitter threads, and YouTube videos into one of the interest-based topic labels provided.

"""
Technology: Documents covering the latest trends, innovations, and advancements in technology, including topics like AI, artificial intelligence, machine learning, robotics, virtual reality, gadgets, cybersecurity, programming languages, breakthroughs, hardware devices, cryptocurrency, and software development.

Health & Wellness: Documents covering physical and mental health, fitness, nutrition, medicine, and alternative therapies, providing insights and tips for maintaining a healthy lifestyle.

Science: Documents covering discoveries, research, and developments in various scientific fields, such as physics, chemistry, biology, astronomy, and earth sciences.

Business & Finance: Documents covering the world of investing, sales, marketing, economics, companies, earning reports, and personal finance, offering advice and analysis for professionals and enthusiasts alike.

Startups: Documents covering the ecosystem of startups, including entrepreneurship, venture capital, startup culture, innovation, business strategies, and the challenges and successes of launching and growing new ventures.

Lifestyle: Documents covering topics related to travel, fashion, home decor, and other advice to enhance everyday living and personal interests.

Family & Relationships: Documents covering topics related to family dynamics, parenting, relationships, marriage, and interpersonal communication, offering advice and insights for nurturing healthy and fulfilling connections.

Arts & Culture: Documents covering literature, music, visual arts, performing arts, and architecture, showcasing the creative expression and cultural heritage of societies around the world.

Education: Documents covering learning methods, educational technology, teaching strategies, and online courses, catering to educators, students, and lifelong learners.

Environment: Documents covering sustainability, conservation, climate change, and renewable energy, highlighting the importance of environmental stewardship and sustainable living.

Politics & Society: Documents covering analysis and opinions on current events, social issues, government, and international relations, offering perspectives on the dynamics of society and politics.

History: Documents covering historical events, figures, archaeology, and cultural heritage, providing insights into the past and its impact on the present and future.

Sports & Recreation: Documents covering various professional and amateur sports, fitness trends, outdoor activities, and athletic training, catering to sports enthusiasts and those seeking active lifestyles.

Food & Drink: Documents covering culinary arts, restaurants, recipes, food trends, and beverages, offering inspiration and ideas for cooking and dining experiences.

Entertainment: Documents covering humor, satire, movies, TV shows, celebrity gossip, and updates about the entertainment industry, providing light-hearted and enjoyable content.

Productivity & Self-Improvement: Documents covering time management, getting things done, life-hacking, organization, note-taking, and efficiency strategies, offering tips and tools for improving personal and professional productivity.

Research Papers: Documents such as scholarly articles, academic research, and scientific studies across various disciplines, providing in-depth analysis and insights into specialized topics.

Professional Documents: Documents of an internal and often private nature including legal documents, internal communications, and project management materials, catching documents likely uploaded by a professional attempting to manage and organize their work-related documents.
"""

You select a category from this list only without any further explanation.

Here is the content:
"""
Title: {{ document.title }}
Author: {{ document.author }}
Domain: {{ document.domain}}
{% if (document.content | count_tokens) > 2000 %}
{{ document.content | central_sentences | join('\n\n') }}
{% else %}
{{ document.content }}
{% endif %}
"""

VERY IMPORTANT: Return only the category and nothing else.

Most appropriate category:
If you take the time to develop a taxonomy for your tagging system, you’ll discover that what you’ve been doing is probably not so much of a “tagging system” but rather a random mishmash of sometimes-applied tags. That’s okay. That’s how most of us tag.
But what it means is that there probably isn’t enough of a structure that an AI could learn your tags just by the names of tags you’ve used before. Instead, you need to sit down and actually develop a system that can be described. If you can do that, GPT can be directed. Admittedly, that can be a fair amount of effort.
It works best if you reduce your set of tags to something reasonable. We recommend no more than 50.
You can copy your tags from the command palette (”Copy all tags to clipboard”) to help make this process easier.
Also, we’ve discovered that it’s really important that each tag in your taxonomy sits in the same hierarchy. For example, if you create a category "Artificial Intelligence" alongside a category "Technology", GPT will often default to the broader category of Technology even for articles that are obviously about AI.
Post-Reading Prompt
You can write a prompt that uses your highlights—and the tags you used on those highlights—to tag documents after you read.
Write three comma-separated topic labels to tag the following text:
"""
Title: {{ document.title }}
Author: {{ document.author }}
Domain: {{ document.domain}}
{% if (document.content | count_tokens) > 2000 %}
{{ document.content | central_sentences | join('\n\n') }}
{% else %}
{{ document.content }}
{% endif %}
"""

{% if document.highlights | length %}
Here are the highlights I took while reading the text as well as my notes and highlight tags:
"""
{% for highlight in document.highlights %}
{{ highlight.content }}
    {% if highlight.tags | length %}
    Tags: {{ highlight.tags | join(', ') }}
    {% endif %}
    {% if highlight.note | length %}
    Note: {{ highlight.note }}
    {% endif %}
{% endfor %}
"""
Obviously, my highlights, notes, and highlights tags are particularly important context for the information I found most important. Please give them extra consideration when writing three comma-separated topic labels.
{% endif %}

VERY IMPORTANT: Format your response as a comma-separated list of exactly THREE tags. Use tags in my existing schema.

Three comma-separated tags:
If you didn’t use any tags, GPT will make up some tags here. Some people are fine with that. Some are not.
Tags added automatically to a document by the "Tag this document" Ghostreader command will have a hashtag symbol at the beginning of the tag name (e.g. #tech instead of tech) to indicate it was generated by AI. These tags work the same as versions without the hashtag (tagged documents appear in the same filters, and clicking the tag name will display both hashtag and non-hashtag versions). The hashtag prefix is a visual affordance for quick identification.
Ultimately, it's up to you to decide if auto-tagging enhances your workflow enough to be worth the effort. That said, if you come up with any awesome auto-tagging prompts and would like to share them, we'd love to hear from you!